Pokémon is one of the most popular video game series of all time, with millions of players worldwide. If you’re a fan, then you know all about the classic creatures known as Pokémon. If you’re not familiar with them, Pokémon are creatures that inhabit the world in which the games take place. You play as one of these creatures, traveling around the map and capturing other Pokémon to add to your team. In this guide, we will teach you how to draw a Poké Ball from Pokémon using basic shapes and colors. We will also provide tips on how to create different features such as eyes and mouths. So if you want to learn how to draw a Poké Ball like a pro, read on!
What you will need
If you’re a fan of Pokémon and want to learn how to draw a Poké Ball from the game, this guide is for you! First, let’s create our basic shape. We’ll start with the base of the ball, and then add in the details.
First, we need to sketch out our basic ball shape. We’ll start with a rectangle and then make the outline of the ball. Next, we’ll add in some details like the indentation for where the button goes, as well as the circles around it.
To create these circles, we’ll use a method called “doubling up.” This means that we’ll first make a small circle using one brushstroke, and then we’ll fill it in with another brushstroke that has been doubled. This helps create a nice round edge on our circles.
Now that we have our basic shape figured out, it’s time to start adding in some colors. We can do this by either painting over our existing shapes with different colors or by drawing new shapes and then filling them in with color.
For our Poké Ball tutorial, we’ll be using two colors: green for the background and yellow for the details. To begin painting over our base shape, we’ll use a green brush to cover everything except for the indentation where the button will go.
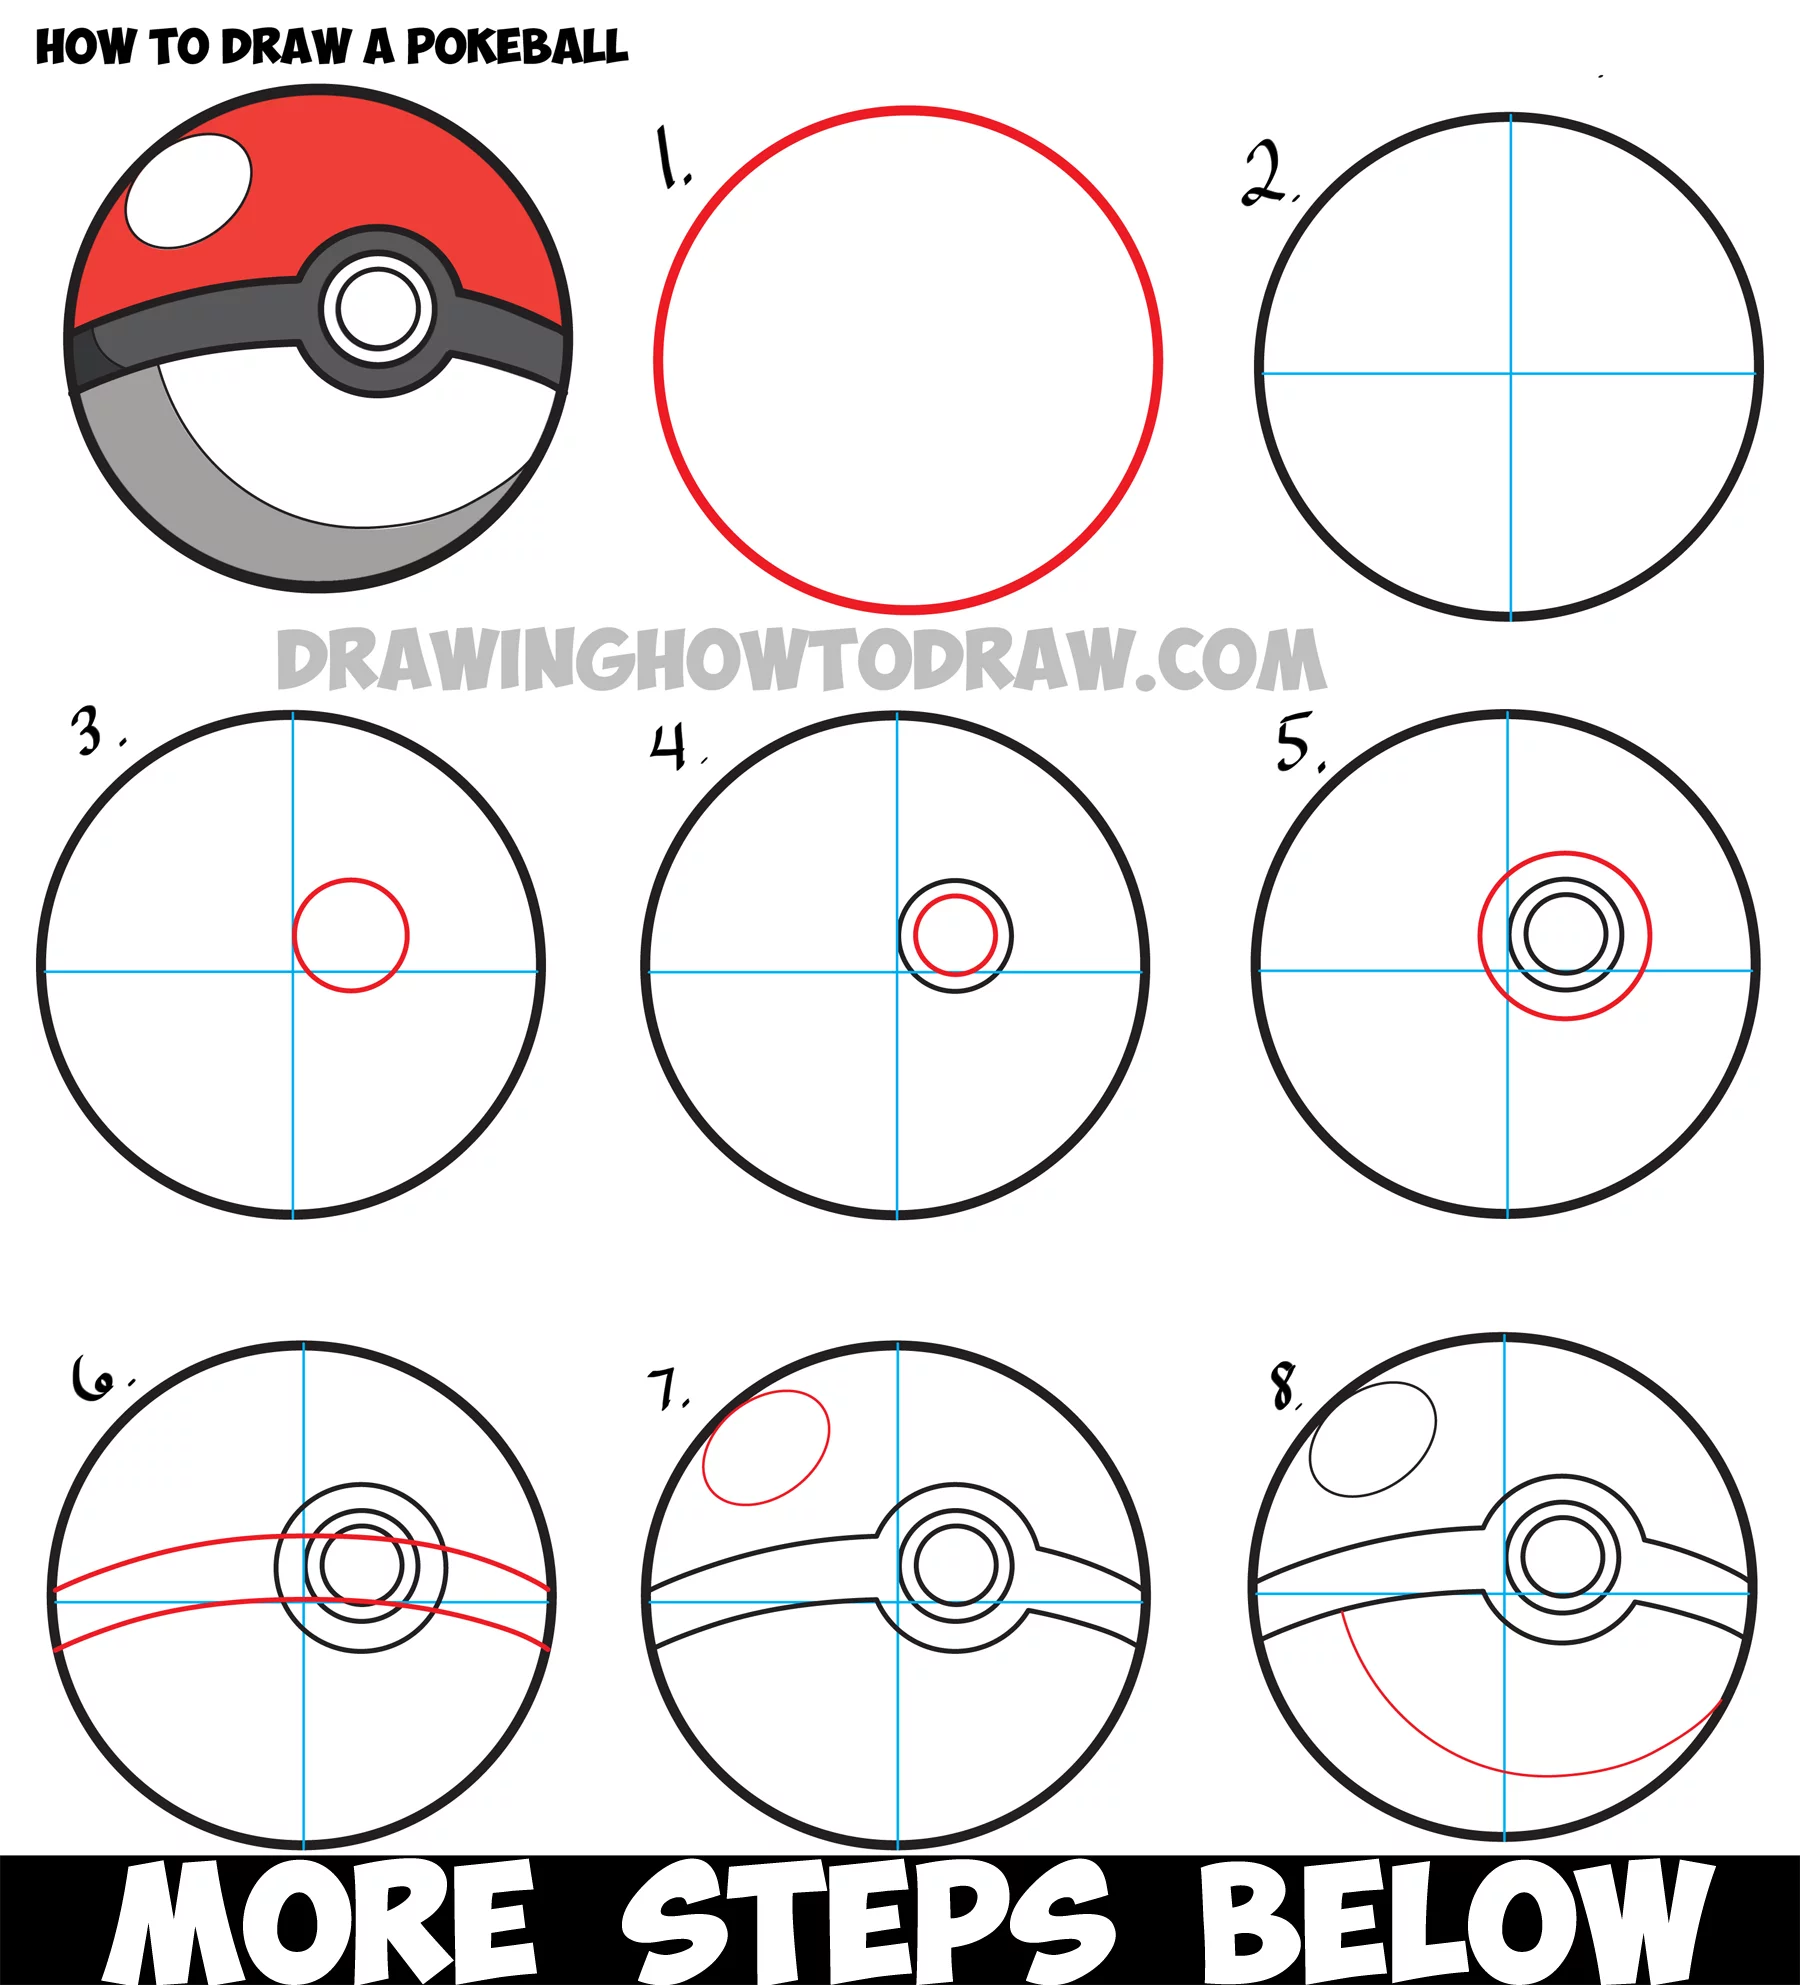
How to draw the Poké Ball
There are a lot of ways to draw a Poké Ball from Pokémon, so it’s up to you to find the one that you like best. Here are three easy steps to follow:
Step 1: Begin by drawing a basic circle shape on your paper. This will be the ball’s outer casing.
Step 2: Next, add in details such as the indentations and curves around the edge of the ball. Be sure to make it look realistic!
Step 3: Finally, add in iconic Pokémon symbols and colors onto the ball. Let your creativity shine!
How to make the Poké Ball spin
When you’re trying to draw a Poké Ball from Pokémon, you’ll want to make sure that the ball spins realistically. Here’s how to do it:
Inner Surface
Start by drawing a basic circle for the ball’s interior. Next, use a radial gradient fill to create the turquoise color that will be seen inside the ball. Finally, add in some light dusting with a small brush to give it an uneven appearance.
Outer Surface
Next, draw another simple circle for the ball’s exterior. Use a linear gradient fill to create the silver color that will be seen on the outside of the ball. To finish off, add some light speckles with a small brush.
How to make the Poké Ball spin
In this guide, we will show you how to make the Poké Ball spin in 3 easy steps.
1) First, draw a circle on a piece of paper that is slightly smaller than your drawing pad. Make sure it is big enough for the Poké Ball’s outline but not so big that it takes up too much space.
2) Next, take your pen and start outlining the Poké Ball in the middle of your circle. Don’t forget to give it a bit of an arch since it will be spinning.
3) Finally, use your black paintbrush to add some small highlights around the edges of the Poké Ball. Make sure to partially cover up the white circle around its center so that when it spins, it looks like it is filled with light!
How to make the Poké Ball disappear
One of the most popular parts of Pokémon is the Poké Ball. Whether you’re a beginner or a more experienced player, creating your own Poké Balls is always fun. In this guide, we’ll show you how to make your Poké Ball disappear using Photoshop.
To start, open up Photoshop and create a new document. We’ll be using a 1920 x 1080 resolution for this tutorial, so make sure that your document size is at least that large. Next, we’ll need to add some basic shapes to our document. To do this, select the Ellipse tool (L) and draw an ellipse in the middle of your document window. Next, Select the Rectangle tool (M) and draw two rectangles on either side of the ellipse: one just above it and one just below it. Finally, use the Pathfinder tool (PG) to merge these three objects together:
Now that we’ve created our basic shapes, let’s start adding color to them. Start by selecting the HSB colors palette and painting over both of the top rectangles with light blue:
Next, select both of the bottom rectangles and paint them with dark blue:
Now we need to add some details to our ball. To do this, select the Starburst Tool (S) from the toolbar and start drawing stars around each of the edges of the ball:
Once you’re finished with these stars, let’s add some
The Steps
1. Begin by drawing the basic outline of your Poké Ball on a piece of paper. Make sure to keep the proportions correct so that it looks like the real thing.
2. Next, add in the details of the ball including its colour, outlines and materials. Be creative with this part and you can even make your Poké Ball look different from others!
3. Finally, add in the Pokémon inside your ball and give it a finishing touch. Be sure to include their movements and expressions so that your drawing looks realistic.
Tips for Drawing Perfect Poké Balls
There are a few things you’ll need to have before starting:
-A pencil
-A paper
-Paint or a drawing program
-A ruler or some other straight edge
-An eraser
-Some Poké Balls (optional)
Step 1: Begin by sketching out the basic outline of your Poké Ball on paper. Make sure it’s slightly smaller than the real thing, as you’ll be modifying it later.
Step 2: Once your outline is complete, start painting in the background color of your ball. I used yellow here, but you can use any color that suits your artistic taste. Don’t worry too much about accuracy; just go with something that looks good.
Step 3: Once the background is finished, start adding in the details of your Poké Ball. I added in a simple rim and some small spikes along the bottom, but feel free to add more if you’d like.
Step 4: Finally, erase any unwanted parts of your drawing and congrat yourself on a job well done! Now it’s time to get creative and make some actual Poké Balls!
Conclusion
Today we’re going to be learning how to draw a Poké Ball from Pokémon, step-by-step! Creating a realistic ball is not as difficult as it seems and with the help of this guide you’ll be drawing one within minutes. So let’s get started – first things first, we need to sketch out our basic shape.