Have you ever had to answer to a boss who doesn’t seem to understand the concept of emails, text messages, phone calls etc. Well, if you do then you are not alone. In fact, it’s estimated that more than 50% of people spend a third of their day on email.
That’s why it’s important to find ways to get out of your inbox and actually use your time productively. One way of doing this is by setting out of office hours. This can be achieved easily within Microsoft Outlook. Simply go into settings, choose the option for ‘out of office’, and enter the dates you will be unavailable. You’ll receive an automatic reply telling everyone you’ve gone away.
However, there are many other things you can do to get rid of your daily “to-do” list.
How Do I Set My Email to Say Out of Office?
soft Outlook 2007, 2010, 2013 or 2016, you can use the “out of office” feature. This is a great way for you to let people know that you won’t be able to respond to emails right away. Here’s how to do this.
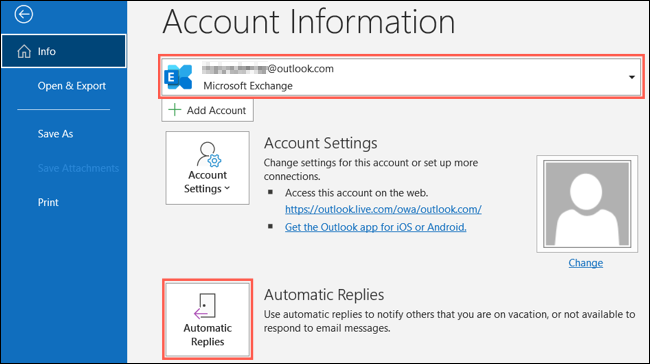
To turn on the “Out of Office” setting, open your mailbox and go to the Tools menu. Then, click Options.
In the General tab, look under the Out-of-Office section. There will be a place where you can specify whether you want people who send you mail to get an automatic reply message or to receive a response from someone else. You’ll also have the option of specifying when you plan to return to work and when you don’t expect to do so.
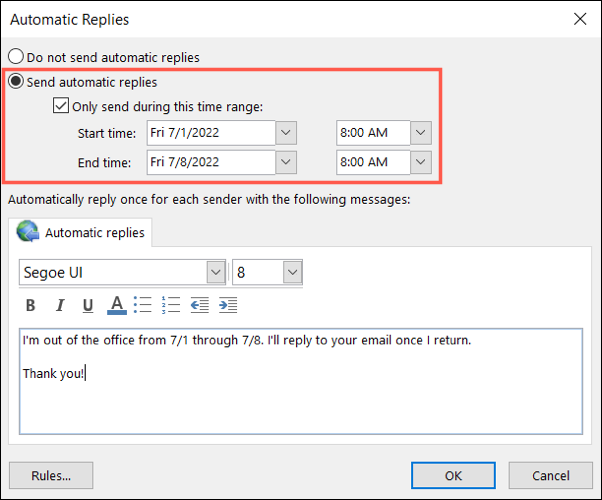
You can choose to automatically send out the “Out of Office” message whenever you leave your desk for more than five hours. If you decide to change this, make sure that you tell everyone about it before you leave.
How Do I Turn on Out of Office in Outlook 365?
Outlook is one of the most popular email programs available. There are several different ways that you can use it to communicate with your family, friends, and colleagues. However, you may have questions regarding how to turn off the “out of office” message. This article will help answer these questions.
To view this video please enable JavaScript, and consider upgrading to a web browser that supports HTML5 video
You can adjust your settings so that the “Send mail as” option displays in a pop-up window rather than on the main screen. You can also change the default setting from “out of office” to “away for vacation” or “busy”.
You can also choose whether you want people to be able to leave you messages when they are away.
If you don’t receive any emails after you’ve turned off out of office, then it’s possible that someone has changed the configuration. To find the right options, click on File, Options, and select Advanced.
How Do I Set Out of Office Status?
In order to make sure that your employees understand the importance of their jobs, you need to have a policy regarding when they can be reached by phone. You should also let them know how long you expect them to take off from work.
You should use an email address as the default for all of your employees. This means that you will always be able to send messages to the entire staff. If you don’t want to receive emails, then you can change the settings on your computer.
When you’re setting out of office status, you’ll need to create a message that explains why you won’t be available. For example: “I’m taking time off to spend with my family. I’ll check in later this week.” Make sure that you include the date that you plan to return.
It’s important to keep your employees informed about any changes that are happening. So, you might consider sending a newsletter once per month.
How Do I Set Up an Out of Office Auto?
Office 365 gives you many great features that make your life easier. For example, you can use Microsoft Outlook to send emails automatically. If you want to be able to know when people reply to your email messages, then you need to have an automatic response system in place.
You should start by creating a new rule in your calendar. This will allow you to specify the times at which you don’t want to receive emails.
Now, you can create a second rule in Outlook. When you do this, you can choose whether you want to respond to all incoming emails, or just specific ones.
If you’re looking for more help with Office 365, then you might consider getting a premium version of the software.
With this extra feature, you’ll get access to advanced tools that are designed to improve your productivity. You can also download templates and other useful resources.
If you decide that you’d like to upgrade, you can contact the customer service team to discuss pricing options.