Are you looking to create a border around the content you’re presenting on a PowerPoint slide, but you don’t know how? Or maybe you just want to separate two sections of text in a table cell. Then this tip will help you.
So let’s say you have a whole bunch of data in a spreadsheet and it has three columns of information. The first column contains the names of a series of items, the second column contains details about the name of the item, and the third column contains additional details. And you’ve decided that you want to put some kind of border around the rows of the third column.
To do this, you can use either conditional formatting, which is explained in detail here, or you can simply add a border to each row by selecting the entire range of cells (i.e.
Why Can I Change the Print Area in Excel?
When you use Microsoft Excel, you might have noticed that you don’t always get to choose where your printed documents will appear. This is true for both the document itself, and the margins. The default settings allow you to set the page size, but you won’t be able to adjust the position of the paper.
In order to make these changes, you need to go into the Print Area section. From here, you can select a new location on the page. You can also add a border around the entire sheet or just the columns.
You can do all of this by selecting the appropriate option from the drop-down menu. For example, you could click the arrow next to “Print Area” and then select the option for the left margin.
If you want to learn more about how to customize your printing options, check out our guide below.
Excel:
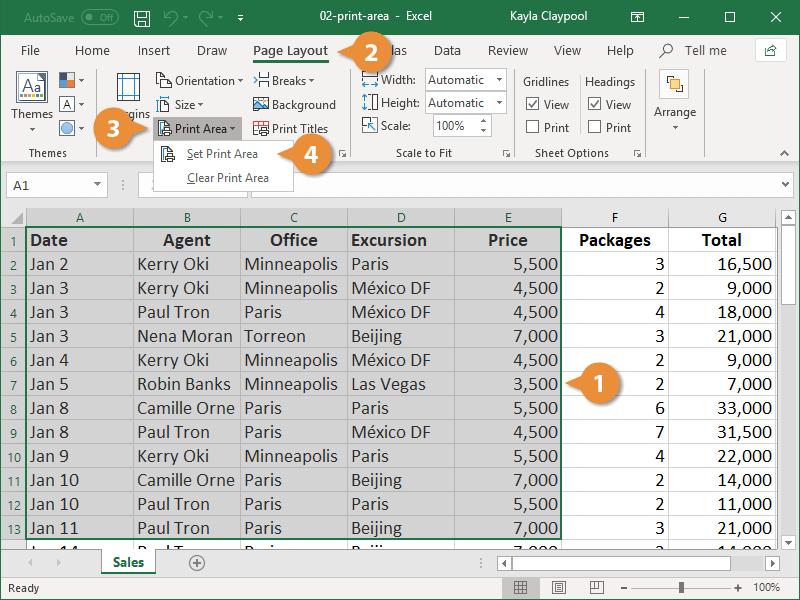
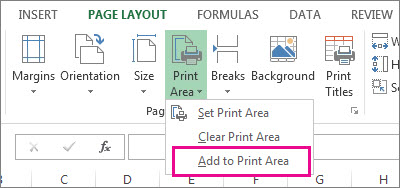
How Do I Set and Clear Print Area in Excel?
You might have heard that you need to use the “Print Area” option to make sure your printer prints the entire page. If this is true, then you’re likely wondering how you can change the setting so that the printing doesn’t take up the whole sheet.
Here’s a quick guide on how to do it. You’ll first want to select Print from the File menu. Then, you’ll click the Options button at the bottom of the window. Finally, you’ll move the cursor over the section labeled Printer Settings. Click on the arrow next to the box, and you should be able to adjust the settings.
If the problem isn’t with the way that you’ve adjusted the settings, then you may need to check the margins on your paper. This is the distance between each edge of the paper, including the top, left, right, and bottom edges. Make sure that these distances are all the same.
How Do I Print Selected Area on One Page in Excel?
Excel is an extremely useful tool. If you want to use this program, then you’ll need to learn how to print certain areas of the spreadsheet. You can easily copy a range of cells from one sheet into another.
But sometimes, you might want to make sure that all of your data is on just one page. For example, you could have a list of items, and you’d like to be able to add new information to the bottom of the document. This can be done by using the Page Setup dialog box.
You should click on File | Print and then select the number of pages that you want to include in your document.
Now, you will want to highlight the entire row or column that you wish to keep on the first page. Then, press Ctrl+P.
This will allow you to move the selection to a different location.
Next, you will simply delete the rows and columns that you no longer need.
How Do I Set Print Area in Sheets?
When you use Microsoft Excel, you can easily set the print area of your document. This is very useful, especially when you want to make sure that a certain portion of the page is visible.
To change the print area, click on the View tab, followed by the Print Range button. Then, you’ll be able to select the areas that you want to show. To do this, simply drag the mouse over the pages you want to include in the printout. You can also choose to hide the rest of the content.
You can do the same thing with Word. Click on the Page Setup icon, and then scroll down until you find the section titled “Print Options.” There are a number of different options available here.
If you’re having trouble finding these settings, you might need to check your printer’s manual.
A lot of printers will have an option that lets you control how much paper is used. If you don’t like the way it prints out, you should try changing the setting.
How Do I Fit to Page in Excel?
When you’re working with Microsoft Office, you’ll want to make sure that you have the right tools. The first thing you need is a printer. This will allow you to print documents so that you can get them off of your computer.
You also need an office suite. This includes programs such as Word, PowerPoint, and Excel. You can use these programs to create presentations, spreadsheets, and other types of files.
If you don’t already own the software, then you can purchase it online. However, you may be able to find free versions of the software. If you do end up using a program that costs money, then you should save up for the full version.
Finally, you’ll need a monitor. Monitors are used with computers to display information and graphics. A good quality screen can help you work more efficiently.
You might also want to consider getting some accessories. For example, you could buy a mouse, keyboard, or headset. These items will let you interact with your computer in different ways.