How to Draw a Skeleton Head
Although there may be many things that separate different people, there is one thing we all have in common. Everyone reading this guide, with everyone on earth, has a skeleton head! The skeleton head is very important because it helps protect the brain and helps keep your head together!
They also became a symbol of fear, and the skeleton’s heads are popular as Halloween decorations. Because they are so complex, it can be difficult to learn to draw a skeleton head unless you have the right guide. You can draw many more characters like bow and arrow drawing, Anubis drawing, betta fish drawing, cobra drawing, blueberry drawing and coconut drawing.
Drawing Skeleton head
Step 1:
We will start with the image’s outline in this first stage of our guide on drawing a skeleton head. The outline of the skeleton head has specific shapes, lines, and structures. We will therefore cover each element slowly and individually. The top of the skeleton’s head will be very rounded, leading to clear lines on the cheekbones.
The jaw bone is also designed with straight lines to make it quite square and angular. Finally, you can extend a few lines inside the head of the cheek skeleton because it will start the outline we will draw later.
Step 2:
We finished the general plane, so now we can start adding some of the features of the face to the skeleton head design. First of all, we will draw the orbits. They are flat and usually oval shapes, but we will use very angular lines to draw them.
There will also be curved lines that extend from their external corners. Then we designed the nose’s cavity, which has a very curious form. It will have two net points at the top with two slightly rounded points at the base. Finally, you can finish this step by starting the irregular lines connecting the teeth’ rows.
Step 3:
For this stage of our guide on how to draw a skeleton head, we will focus on the beginning of the teeth and facial details. For teeth, you can start drawing a line of rounded teeth forms that connect to the central line you started earlier. We will work on the right side at the moment, but we will end later.
Then we will add some simple lines around the eyes and cheeks of the skeleton head to help give more definition. So you are ready to go to step 4!
Step 4:
In this tutorial stage, you will add the rest of the teeth with some additional facial details. For teeth, you will extend what started in the previous step, adding more individual dental forms to the central line you started earlier.
Then we will add other details of the line to the skeleton head, including the jaw, the cheeks, and the eyes, to name only a few. So all that remains is to add some final details to the next step, and you are ready to color!
Step 5:

Let’s focus on certain final details of this part of our guide on drawing a skeleton head. Above all, we will focus on certain details from the skeleton’s head shadow. To do this, we will add some details of the thin line to most contours of the skeleton head, and the reference image will show where they should be placed.
These lines will help to give a little more depth to the head of the skeleton. So you are ready to move on! Before you do it, you must add all the details and add that you may want. There are many creative ways to put your time into this drawing, so be sure to be creative and see what you can find.
Step 6:
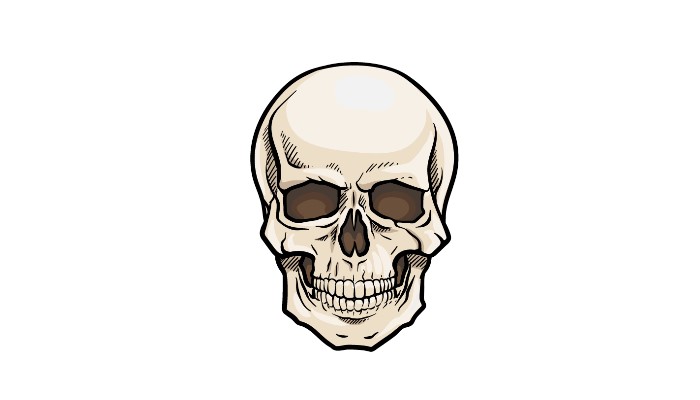
Now comes the last step in the skeleton head design, and at this stage, you will bring amazing colors to your drawing. In our reference image, we used a light beige light for the skeleton’s head while we used brown for the gold and the nose cavity. However, these are just a few examples of what you can choose to use in all the colors you love.
You can keep the colors more realistic, as in our example. Still, it can also be more stylistic by it using brighter colors. So you can have fun deciding the art brackets you will use to apply the colors, and we can barely wait to see which colors and art tools choose!
Do this to pass your draw to the skeleton at the top level
Find out how you can make this skeleton skewer even better with 4 fun ideas! A skeleton head is intrinsically scary for any reason, but you can make it even scarier! It would help to rotate Halloween, and there are many ways to do so. You can add red eyes to this drawing of a skeleton head or maybe change the facial expression to be more sinister. Adding things like spider screens or headquarters in the background would also help you make it scarier.
How can you think more about making this drawing even more frightening than it is now? It also seems cool to incorporate a background in this drawing of the skeleton head. You would have many options on how to make it if you decided to opt for a Halloween spin or not.
Perhaps this may be on the shelf of a room in a poorly-enhanced house or at the entrance of a pirate haunt. These are just a few ideas, but you can probably think of many others to try! So you can also draw more skeletons to which this skull is connected. You can consult a few diagrams of real skeleton structures.
Or you can add another body type to turn this skeleton head into a scary horror character! It would work even better if you added a creative experience, as we suggested in the previous step. What kind of installation do you choose to represent this character?
Another fantastic way to make this even cooler skeleton head skeleton would be to turn it into a sugar skull. These colorful skulls are decorated with bright flowers, shapes, and colors to celebrate the day of the dead.
The addition of this touch would allow you to draw beautiful patterns and use all your bright and vibrant colors. You can look for some examples of sugar skulls on -line if you need inspiration!
The skeleton head drawing is complete!
You finished the 6 steps of this guide on how to draw a skeleton head! We tried to create a more realistic skeleton head for this guide, so there were many small complex details. It may make it difficult, but we hope this guide has shown it can be easy and fun if you have the right steps.
Now you can decide the type of image you want! You can make this image more moderate, representing the skeleton’s head as an object, or maybe more stylistic, making an image inspired by Halloween. It depends on you, and there are many options to follow!
Also Read: University Of Liverpool