Art is all around us, and it’s a great way to relax and escape the daily grind. If you’re looking for some fun and creative art to do, take a look at drawing trees. This guide will teach you everything you need to know about drawing trees correctly so that your sketches look realistic and happy. From start to finish, this guide has everything you need to create beautiful family art.
What you will need
To draw a tree you will need:
-A pencil and paper
-An eraser
-A ruler or other straight edge
-Paint or other drawing medium
-Tree branches (see tutorial below for help finding them)
-Fishing line or thin wire (~12″ long)
-Trees leaves (seen in tutorial)
1. Start by sketching out your basic outline of the tree on paper. Start with the trunk, then add in the branches. Use a light pencil to lightly sketch out the lines and shapes. Erase any mistakes as you go.
2. Once your tree is sketched out, start painting it in with whatever medium you are using. For this tutorial we are using paint, but you could also use markers, ink, etc. Just make sure that the paint is covering all of the tree’s parts and doesn’t leave any white spaces behind. If there are areas that need more detail, like the leaves for example, be sure to add extra details in those areas later on with a finer brush once everything else is dry.
3. Once your tree is painted and dry, it’s time to add in the leaves! The easiest way to do this is by tracing around a leaf that you have access to (found online or in a book), then cutting it out and folding it in half so that the grain runs along one side of the leaf. Then paint over
How to Draw a Tree – The Basics
If you’re ever stuck on how to draw a tree, this tutorial will outline the basics of the process. Start by sketching out your basic shapes and then fill them in with proportional lines. Once everything is outlined, start adding in layers of dark and light to get that realistic look. And don’t forget the leaves! Here are some tips for drawing them perfectly:
Start with a small thumbnail sketch of the leaf shape and make sure to vary the size, shape and placement as you go along. Don’t worry too much about realism at this stage – focus on getting the basic shape down before filling it in with darker tones. Make sure to leave some lighter areas around the edge so that when you add details later on they’ll stand out more. Next, add in thin line shadows along the outer edge of the leaf and use thicker shadows closer to the center. This will help to create a more realistic appearance. Finally, begin detailing your leaf by adding small veins and curved edges. Be careful not to overdo it though – remember that we still want our tree to look natural!
How to Draw a Tree – The Branching Structure
There are many different ways to draw a tree, and the branching structure is one of the most important aspects to consider. There are several steps you need to follow in order to create a realistic tree, and each one is crucial in creating a believable piece of art.
First, start by drawing an outline of the tree’s body on paper. Make sure to include all of the major details like the trunk, branches and leaves. Once you have your outline drawn, begin filling in the details with thin pencil lines. Try not to go too heavy here – just give the basic structure of the tree a foundation.
Once you have the basic shape drawn, it’s time to start adding detail. Start by sketching out the roots into threes or fours, then fill them in with light pencil strokes. Next, add in the main branches using thicker lines. Be sure to vary your branch shapes as much as possible – don’t stick to any specific pattern! Finally, add in all of the leaves – try not to overcrowd them so that they look realistic and 3D-like.
Once everything is finished up, take some time to test out your tree in various positions and angles before finalizing it. Remember: patience is key when drawing trees – if you make mistakes along the way, don’t be discouraged! Trees can take a lot of effort (and practice), but with enough effort and dedication they’ll become one of your favorite pieces of art!
How to Draw a Tree – The Leaves and Flowers
There are a few steps you need to follow in order to create a tree:
1.Start by drawing the basic outline of your tree using a soft brush. Make sure that the base of the tree is wide and bulbous, and that the branches are thin and drawn lightly.
2.Next, add some details to the trunk and branches using a thicker brush. Add tiny leaves to the branches and give them a waxy texture with light shading. Use a small, flat brush for highlights on the leaves.
3.Finally, fill in any remaining details on the tree using a medium or hard brush. Use primary colors to indicate leaf veins and shadowing on the trunk and branches.
How to Draw a Tree – The Twigs and Spines
The first step to drawing a tree is to create the basic structure. Start by drawing a cone-like shape at the base of the tree, with a smaller circle on top. From here, start adding in more and more branches as you go, making sure to keep the overall shape of the cone-like base. Next, add in any leaves that will be present on the tree. For the leaves, simply sketch out a basic outline first and then fill it in with simple shapes. Finally, add any details like petals or veins on the leaves.
Next, it’s time to start adding in the twigs and spines on the tree. To do this, start by Drawing a small circle for each twig and then fill them in with curves and angles. Be sure to vary the length and thickness of each twig accordingly, so they look realistic. Finally, add any additional details like sap or bark on each branch.
And there you have it – your very own tree! If you’re feeling creative, you can even try adding some rural elements like barns or cows nearby for extra realism. Happy family art!
How to start
If you want to learn how to draw trees, there are a few things that you will need. First of all, you will need some paper and a pen or pencil. Then, you will need to create an outline of the tree using straight lines. After that, you can start to fill in the details of the tree using curved lines. Finally, add any final touches to the tree by adding leaves and branches.
Tips for drawing a tree
Drawing trees can be a lot of fun, especially if you have some basic tips that will help you get started. Here are a few ideas to get you started:
1. Start with a simple outline of the tree branches and leaves. Don’t worry too much about the details at this point – you’ll sketch them in later on.
2. Once your outline is complete, start to fill in the individual branches and leaves with thin, lightly-colored pencil lines. Make sure to vary the thickness of the lines to create depth and texture in your tree bark.
3. Once all of the branches and leaves are drawn in, begin to add highlights and shadows to bring out the detail in each leaf. Be sure to use various shades of gray, dark green, and brown for added realism.
4. Finally, add some final details like small twigs ornaments or highlight spots on the trunk of the tree. Keep in mind that trees change dramatically from season to season so it’s always a good idea to experiment with different drawing techniques as you go along!
The different parts of a tree
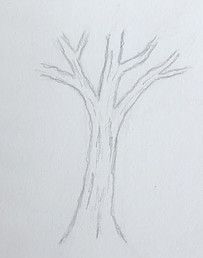
The different parts of a tree can be found by briefly looking at the following drawing:
The trunk is the main part of the tree and it’s usually at the base. The trunk is usually cylindrical in shape, with a diameter that gets bigger closer to the top. The branches grow from the trunk and each branch has several leaves. The leaves are flat and have veins running through them. They also have a stalk that grows out of the center of them.
The root system is underground and it helps hold the tree up. It’s spread out over a wide area and contains many smaller roots.
How to draw leaves
Start with a basic oval shape for the leaf base. Use the pencil to lightly sketch in the outline of the leaf, making sure to keep it symmetrical. Next, fill in the center of the oval with a light green color and draw a curved line outwards from it. This will be your stem.For the next step, you’ll need to start drawing in the veins on top of your leaf. Start by drawing two small lines that run down the center of your stem, then continue to add more lines as needed until you have a detailed vein pattern. Finally, add some extra details like small bumps or indentations on the surface of your leaf.When it comes to coloring your leaf, use a light green color for the highlights and darker greens for the shadows. To make sure everything looks proportional, use rulers or paperclips to help guide your strokes.happyfamilyart
How to draw a trunk and branches
If you want to learn how to draw a tree, this tutorial is for you! In this guide, we will cover the steps necessary to create a realistic looking tree trunk and branches. Let’s get started!
To start off, sketch out your basic outline of the tree trunk using a light pencil. Next, use a thicker pencil to outline the basic shape of the tree branches. Make sure to vary the thickness of your lines so that they look like they are growing out of the trunk and into the air. Finally, add in some details such as leaves and bark. Be sure to go back and re-draw any areas that you feel need improvement.
Once your basic tree is complete, it’s time to start adding in color. Start by painting over your entire outline with a light coat of black paint. This will help give your tree an overall darkness and realism. Once black is dry, begin to add in shades of green using a soft brush. For the tips and branches of the tree, use a darker green color that stands out more from the black background.
Next, mix together two shades of yellow paint and brush them on top of all the green paint that has been applied so far. This will create highlights on top of all the leaves and branches. Finally, add in some lighter colors around the edges of each leaf and branch for extra detail. Voila! Your beautiful tree is finished!
Conclusion
If you’re interested in learning how to draw trees, this full guide is for you! In this article, we’ll teach you the basics of tree drawing, from the root system all the way to the leaves and branches. We’ll also include instructions on how to create a happy family out of your tree drawings, perfect for adding a little holiday cheer to your home. So what are you waiting for? Start drawing today!