Dogs are some of the most popular pets in the world, and with good reason – they’re cuddly, adorable creatures that make us happy. If you’re new to dog drawing, this guide is for you. It’ll teach you the basics of character design, composition, and shading, so that you can start capturing those wagging tails in pencil or ink.
How do you draw a easy dog for kids?
If you want to draw a dog for a kindergarten or elementary school project, follow these simple steps:
1. Start with a basic outline of the dog’s body- use the guidelines below as a guide.
2. Add in anydetails you want- ears, eyes, muzzle, paws and so on. Use broad strokes to create these features.
3. Next, add in the dog’s fur- start with just the outlines of the strands and gradually add in more details. Again, use broad strokes to get started.
4. Finally, add some color to your dog’s features- use light colors for the fur and dark colors for the eyes and nose. Give your dog a cheerful expression and you’re finished!
How we draw a simple dog?
There is not much to say about this subject. We will just show you how to draw a simple dog step by step.
First, sketch an outline of the dog’s body with a light pencil. Than, fill in the outline with a darker pencil. Don’t worry too much about the details at this point, just focus on overall shape and proportion.
Next, add some basic lines and highlights to the dog’s fur using a lighter pencil. Be sure to add some depth and character to the fur by shading it in different directions.
Finally, add any final details to the dog’s features, such as eyes, nose, and mouth. Use a darker pencil to add shadows and highlights to these areas, making sure to keep their shapes proportions correct.
How do you draw a good cartoon dog?
If you want to draw a good cartoon dog, you should start by sketching out the basic shape. You’ll need a short, stubby body with a wagged tail and big ears. Add some wrinkles or folds to the skin to give it life. Then add in the eyes, muzzle, and teeth.
To create the dog’s fur, start by drawing thin lines down the animal’s back. Use light and fluffy lines to create long fur on top of that. For shorter fur, use dabs of paint instead of lines. Make sure to carefully shading each section of the dog’s body.
Add highlights to the fur using a light color, like white or light brown. Finally, add in any extra details like whiskers or a tongue. When you’re finished, be sure to clean up your drawing with a layer of white paint so it looks realistic.
How do you draw a easy Chihuahua?
In this article, you will learn how to draw a Chihuahua dog very easily. The steps are simple and the finished product is quite cute. If you want to improve your drawing skills, read on!
1) Start with a basic circle shape for the body. Don’t worry about the details at this stage – we will add them later.
2) Add two small circles for the eyes and nose.
3) For the ears, make two triangular shapes using the same basic circle as the base.
4) Now add some shading around the edges of the body, using darker colors towards the center of the creature and gradually lightening towards the edges.
5) Finally, add some details to the face – a mouth, eyebrows and Chin. Use thicker lines for these areas to create a more realistic effect. Give your Chihuahua a smile by adding a small dot in front of its mouth.
how to draw a dog step by step
If you have always wanted to learn how to draw a dog, then this tutorial is for you! Drawing a dog is not as difficult as you might think, and the steps outlined below will help you get started.
1. Begin by sketching out a basic outline of your dog’s body on paper. Be sure to include its head, neck, and limbs. Notice that the proportions of a dog’s body vary depending on its breed – so be sure to take this into consideration when drawing your dog.
2. Next, begin to fill in your dog’s outline with light pencil strokes. Be sure to pay attention to the proportions of your dog’s body, and try to create realistic details such as wrinkles and folds in skin.
3. Once the basic outline is complete, start adding in some darker tones with a #2 pencil. This will help to create the impression of fur on your dog’s body.
4. To add extra shading and detail to your dog, use a softer pencil such as an HB or B pencil. Go back over areas that you want darker shade, and use circular motions with the tip of the pencil to create realistic highlights on
how to draw a dog face
In this tutorial, we will show you how to draw a dog face using basic shapes and strokes.
To start out, sketch an oval for the head. From there, create the eyes and nose by drawing a small circle for each. Finally, add the pupils and mouth using simple curved lines.
how to draw a dog realistic
Looking to learn how to draw a dog realistically? You’ve come to the right place! In this post, we’ll show you how to create a simple and straightforward dog portrait using basic shapes and strokes.
Step 1 To begin, sketch out a basic outline of your dog’s body on paper. Use long, sweeping lines to define the contours of the animal’s body. Be sure to include its head, neck, shoulders, and legs.
Step 2 Next, add in some small details like eyes and nose. Use curved lines and dots to create realistic facial features. Add some light shading around these areas to give the dog a bit of depth.
Step 3 Finally, add in some highlights and shadows to bring out the animal’s features. Use short strokes and curves to create highlights on the dog’s fur, while using longer strokes for shadows.
Now that you know how to draw a simple dog portrait, you’re ready to start creating your own canine characters!
how to draw a dog cute
If you’re planning on Drawing a Dog for fun, or for a bit of decoration for your home, keep reading! This guide will teach you everything you need to know in order to create a cute little doggie that’ll be sure to make everyone smile.
When beginning this tutorial, you’ll need some basic supplies. You’ll need paper, pencils, and an eraser. Begin by sketching out a basic outline of your dog’s body on the paper. Use simple shapes, and avoid too much detail at this stage – you’ll be able to add more details later on. Next, begin adding in some basic features. For example, add in the dog’s eyes and nose. Remember not to over-emphasize these features at this stage – you’ll be able to refine them further as you go along.
Now it’s time to start filling in the details of your dog’s body. Start by adding in the furrows on the dog’s back, and then work your way down to the tips of his ears. Next, add in any other distinguishing features – such as teeth or whiskers. Once everything is completed, use an
how to draw a dog paw
One of the most common things people want to learn how to draw is a dog paw. This is an easy exercise, and the results will be very satisfying.
There are a few things you’ll need to get started:
-A pencil or a pen
-A piece of paper
-An eraser
-A ruler or a straight edge
-Paint or charcoal (optional)
1. Start by sketching out the general shape of the paw on your paper. It doesn’t have to be perfect, just rough so you can start filling in the details later. Try not to worry too much about proportions at this point – you can fix them later.
2. Next, start shading in the basic shapes of the paw with your pencil or pen. Don’t be afraid to go heavy here – this is just a foundation for your artwork.
3. Once you’ve filled in all the basic shapes, it’s time to start adding detail. Use your fingers and palms to create wrinkles, creases and other anatomical details. Be sure to vary the intensity of each shade, as this will give your drawing more realism.
4. Finally, add some FINAL touches to
how to draw a dog video
If you want to draw a dog, there are some easy steps that you can follow. In this video, we’ll show you how to do it step-by-step!
how to draw a dog face easy
If you’re looking to learn how to draw a dog, this tutorial is perfect for you! In this article, we will teach you the basics of drawing a dog’s face, starting with the basics of anatomy and moving on to facial features.
To start, use an HB pencil to sketch out the basic outline of the dog’s head. Next, fill in the basic shapes with thin lines. Don’t worry about getting too detailed at this point – you’ll be able to add more details later on.
Now it’s time to start sketching in the dog’s eyes. Use a light circle for the iris and a heavier line for the pupil. Add some wrinkles around the eye for realism.
Next, sketch in the nose using a curved line. Make sure that it’s big enough so that the dog can breathe properly. Add whiskers along the muzzle using small circles. Finally, add fur on top of all of these sketches using thin lines. Don’t worry about getting it perfectly accurate – you can tweak it later on.
how to draw a dog with numbers
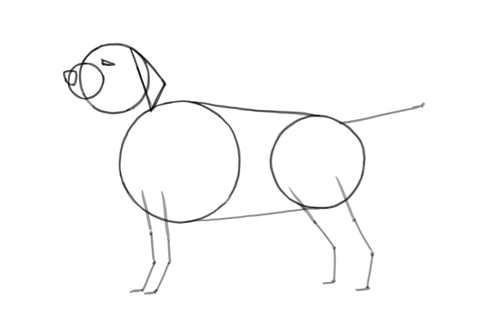
If you are looking for a fun and easy way to learn how to draw a dog, keep reading! In this tutorial, we will show you how to draw a dog step by step. We have included useful numbers along the way so that you can follow the steps easily.
1. First, start with a basic circle for the body of your dog. Make sure that the circle is big enough that it can be filled in later on.
2. Next, add some more circles for the legs and tail. Again, make sure that these circles are big enough to cover up later on.
3. Now start adding details to the dog’s body: its eyes, nose, and mouth. Add these details in carefully so that they look realistic and lifelike.
4. Finally, add a few more circles for extra highlights and shadows on your dog’s body. Experiment with different colors and shades to create the perfect look for your drawing!
how to draw a dog simple
If you’re looking to draw a simple dog, here’s a guide to help you get started.
1. Start with a basic circle or oval shape. Draw the outline lightly with a light pencil, and fill in the blank space with a light shade of gray.
2. Add more details to the outline, using darker shades of gray for the fur and darker tones of brown for the body. Don’t forget to add details like eyebrows, ears, and teeth.
3. To add dimension to your dog’s body, use curved lines to create sinews and muscles. Sketch in shadows with a black pencil for an added realism.
4. Finish up by adding highlights to specific areas like eyes, nose, and mouth – be sure to vary the intensity of each highlight according to its location on the dog’s anatomy.
There you have it – a simple guide on how to draw a dog! If you’re looking for more detailed steps or diagrams, be sure to check out some of the other great drawings tutorials on this blog!
pictures of how to draw a dog
If you want to learn how to draw a dog, you’re in luck! In this article, we will show you step-by-step how to draw a dog. With the right instructions and some practice, you’ll be drawing cute canines in no time!
When it comes to drawing dogs, there are a few things to keep in mind. First and foremost, always remember to sketch lightly at first so that you can develop the basic shape of your dog. Second, take your time when rendering each individual furrow and muscle on the dog’s body. Finally, make sure to add realistic eye colour and expressions onto your canine friend.
To begin, start by drawing a basic oval figure for your dog’s body. The oval should be slightly longer than it is wide – this will be important when it comes to proportioning the rest of the dog later on. Next, start adding in broad furrows on top of the oval using a light pencil. Be sure to leave enough room between each furrow for subsequent layers of shading. Once all the furrows are in place, start adding smaller details like eyes and teeth. Make sure that all of these small details are drawn with care – they will be crucial when it
how do you how to draw a dog
Looking to learn how to draw a dog? Look no further! This guide will teach you the basics of drawing a canine character, step by step.
In order to achieve a realistic looking dog, it is important to start with accurate proportions. When drawing a dog’s head, use an oval shape for the skull and ensure the width and height of the oval are equal. When drawing the muzzle, use an egg-shape and make sure that the width of the nose is about one-third of the overall width of the muzzle. The eyes should be small and set close together in the face, while the ears should be long and thin. To create a furrowed brow, begin by making an indentation on each side of your dog’s forehead, then draw lines down toward the nose. Finally, add any extra details such as wrinkles or whiskers.
When it comes to body structure, first sketch out your dog’s basic outline using broad strokes. Next, fill in individual muscles with thin lines, avoiding excessive detail. Add wrinkles and folds where necessary. To create realistic skin tones, use a light color on top of darker tones. To create realism in hair textures, start with a base color (usually black) and
how to draw a dog draw so cute
If you have always wanted to try your hand at drawing a dog, then this tutorial is perfect for you! Drawing a dog can be a great challenge for anyone, but our tips will help make the process both easy and fun.
First, let’s start with the basics. A dog is composed of several key elements: the head, body, front legs, back legs, and tail. To draw a dog correctly, it is important to start with these essential parts first.
To begin, sketch out the basic outline of the head using a sharpened pencil. Next, highlight the features of the face with more detail. Notice that the eyes are large and should be prominently placed on either side of the head. Also pay attention to the ears and mouth – they should be simple but recognizable shapes. Once you have completed the basic outline, use another pencil to fill in any missing details (such as hair).
Next, begin to add details to each of the other key areas of the dog’s body. Start by drawing in the outline of each leg – be sure to include all of the important anatomical details (such as bones and muscles). Once you have finished this step, start adding in layers of shading to give your
how to draw a dog cartoon
If you are looking for a fun, easy and rewarding way to learn how to draw a dog, then this tutorial is perfect for you! In this article, we will show you how to draw a simple cartoon dog using basic shapes and basic strokes.
To start off, we will need to create a basic head shape. To do this, first draw a circle with your pencil. Then use the eraser to erase the circle so that only the edges of the circle remain. Next, use your pencil again to draw a few horizontal lines across the top of the circle. These lines will be the base of our dog’s muzzle. Finally, add some curves to the muzzle by drawing small circles near the top of the muzzle.
how to draw a dog easy
There are many ways to draw a dog, but this tutorial will show you the easiest way possible. All you need is some pencils, paper, and your imagination!
First, start by drawing a basic outline of the dog’s body. The shape of the dog’s body should be simple and symmetrical. Notice that the dog’s head is positioned slightly forward, so start drawing its head first. The head should be roughly rectangular in shape with a pointed nose and large eyes. Next, sketch out the lines that make up the dog’s fur. You can use any color you want for the dog’s fur, but remember to keep it simple and uniform. Finally, add details such as whiskers and ears.