Hair is one of the most popular forms of art. It’s a natural extension of our human form, and it can convey so much emotion. Why not use it to your advantage? In this blog post, we will be demonstrating how to draw hair in pencil using easy to follow instructions. We will teach you everything from the basics of hair anatomy to more advanced techniques, so that you can create beautiful hair art of your own.
What You’ll Need
If you’re looking to learn how to draw hair, then this guide is for you! In this tutorial, we’ll outline the steps needed in order to create realistic hair without any difficulty. Whether you’re a beginner or an experienced artist, these easy-to-follow instructions will help you get the results you desire.
First, start by sketching out the basic shape of your hair using a few simple strokes. Don’t worry about getting it perfectly accurate just yet – we’ll perfect it later on. Next, add in some light layers of darkness around the base of your hair shaft. Use short, choppy strokes to achieve this effect.
Now it’s time to start adding highlights and shadows to your hair. Darker tones should be used for shadows and lighter tones for highlights. To get started, use a soft brush to paint along the edges of your highlights and then blend them in with a light brush. Be sure to follow the direction of the light source – this will ensure that your highlights stand out correctly.
Finally, add in some individual strands of hair using thin lines and dots. Remember to keep everything smooth and free from unwanted details – if necessary, use a layer of white pencils over your drawing for added clarity. Once finished, take a look at your work and make any necessary adjustments before moving on to the next step!
How To Draw Hair Step-By-Step
If you’re looking to learn how to draw hair, this tutorial is for you! In this guide, we’ll show you how to sketch out basic hair shapes and add details like individual strands and roots. Once you have the basics down, explore our tutorials on creating realistic hair textures and coloring. Whether you’re a beginner or an experienced artist, we think you’ll find these tips helpful!
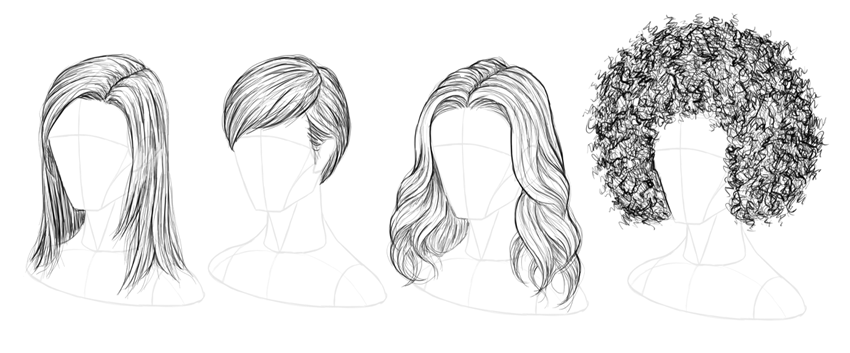
Different Types of Hair
Hair can be divided into four main types: straight, wavy, curly, and frizzy. There are many different ways to draw each type of hair, so it’s important to know the basic instructions before beginning.
Straight hair is easiest to draw because all you need is a straight line down the middle of the head. For wavy hair, start by drawing a wave on one side of the head and then follow the curve until you reach the end. Curly hair requires a little more effort because you’ll need to use several lines to create the curls. Frizzy hair can be difficult to draw because it requires precise and accurate lines. If you’re new to drawing hair, it’s best to start with simpler styles first and work your way up.
How To Draw Hair on the Head
Hair is a very important part of a person’s appearance, and can be drawn with relative ease using pencil. Here are easy to follow instructions in pencil to help you get started.
1. Begin by drawing a basic outline of the hair on the head using a light, loose stroke. Don’t worry about precision at this point – just make sure the outline is consistent throughout the entire hair section.
2. Next, begin adding in small details such as individual strands of hair, roots, and curves. Be sure to use varying shades and tones of pencil to create an realistic effect.
3. Once all the details have been added in, finish up by highlighting any areas that will be visible when the hair is drawn on top of skin (such as highlights or darkened sections around the eyes).
4. To complete your masterpiece, take some time to lightly retouch any mistakes that may have occurred along the way before exporting your image for use in your artwork or design project.
How To Draw Hair on the Body
If you want to learn how to draw hair on the body, follow these easy steps in pencil. Start by creating a basic head shape and then add in the features you want your hair to have. For example, if you’re drawing hair on a woman, start by adding a triangle for the forehead, followed by horns or curls for the hair. For men, add a V-shape for the neck and then go from there.
Once you have your basic outline drawn, it’s time to start shading in the hair. Use light lines to create highlights and shadows, and be sure to vary the intensity of each stroke according to how much light is hitting your hair at that particular moment. Finally, add any finishing details like highlights or shadows on the tips of the hairs.
Tips for Drawing Better Hair
1. Start with a basic hair shape, such as a cone or pyramid. This will help you to get an overall idea of the style.
2. Next, add in the individual strands of hair using a variety of shapes and techniques, such as loops, dashes, and curves. Don’t be afraid to use different tips and brushes to achieve the look you desire.
3. Finally, finish up by adding highlights and shadows to bring everything together. Use light and dark lines for added depth and impact.
Preparing Your Hair
There are many different ways to draw hair, and all of them can be very effective. The most important thing is to start with a basic shape, and then add detail as you go.
1) Begin by sketching a basic outline of the hair on paper. Be sure to include the base of the hair, any tendrils, and any highlights or shadows.
2) Next, begin adding in some smaller details. Start by drawing small lines around each individual strand of hair, and then adding in a bit of shading to help define the shapes.
3) Once all the individual strands are defined, start working on the highlights and shadows. Add tiny dots of light and dark to create the desired effect.
4) Finally, add in any final details like highlights on the scalp or shadows along the neckline. Be sure to experiment with different techniques to find what works best for your project!
Steps to Drawing Hair in Pencil
If you’re looking to learn how to draw hair in pencil, this guide is for you! In this tutorial, we’ll show you step-by-step how to create realistic hair with easy-to-follow instructions. First, start by sketching out a basic outline of your hair. Next, add some layers of light and dark tones to create depth and character. Finally, finish up by adding highlights and shadows for extra realism. Here are the steps:
1. Begin by sketching out a basic outline of your hair with pencil. Be sure to add plenty of light and dark tones so that you can create depth and character.
2. Next, add layers of light and dark tones to the hair outline to create depth and character. Be sure to use separate layers for different areas of the hair – for example, light at the roots, darker near the tips.
3. Finally, add highlights and shadows to give your hair a more realistic appearance. Use heavier shadows on top of lighter areas, or vice versa, for extra accuracy.
Tips and Tricks for Drawing Hair in Pencil
If you want to draw hair in pencil, there are a few tips and tricks that you should know. Firstly, start with a rough outline of the hair shape. Use broad strokes to create the basic shape, then refine it using smaller, more delicate strokes. Next, add highlights and shadows to create depth and complexity. Finally, finish up by coloring in the hairs using various shades of brown, black or gray. Here are some more helpful tips for drawing hair in pencil:
-Start with a rough outline of the hair shape. Use broad strokes to create the basic shape, then refine it using smaller, more delicate strokes.
-Add highlights and shadows to create depth and complexity.
-Finish up by coloring in the hairs using various shades of brown, black or gray.
Tips for Painting Hair in Pencil
How To Paint Hair In Pencil:
1. When starting out, use light pencil strokes to get the basic shape of the hair. Allow the hair to be slightly wavy or curly.
2. Once you have the basic shape down, begin adding in darker tones for the hair. Use thicker pencil strokes to create more depth and realism.
3. Lighten up your pencil strokes as you work towards the ends of the hair, where it will be less visible. This will help to create a soft glow against the skin.
4. Always take into account natural light when painting hair in pencil, as it will affect how the color appears on your paper. If your lighting is poor, use a light box or a source of artificial light to improve results.
Conclusion
If you’re ever feeling lost when it comes to drawing hair, fear not! In this full guide, we’ll be walking you through the simple steps needed in order to create beautiful hair on your characters. Whether you are a beginner or have some experience under your belt, this guide is sure to help. So download and start practicing today!