Lips are one of the most important features on a person’s face, and they play a big role in communication. That’s why it’s so important to get them right when you’re drawing them. In this full guide, we’ll teach you everything you need to know about how to draw realistic lips – from anatomy to tips for making your lips look their best. So whether you’re creating a character for a story or just trying to look more realistic yourself, read on and learn everything you need to know!
Why do we need realistic lips?
There are many reasons why you might want to learn how to draw realistic lips. They can be used as a foundation for creating other facial features, or they can be used as standalone drawings to add realism and character to your artwork. Here are five reasons why you should try to learn how to draw realistic lips:
1. They can help you create more expressive characters.
Realistic lips can help you create more expressive characters. When you learn how to draw realistic lips, you’ll be able to add depth and emotion to your illustrations. This is especially important if you want your characters to look realistic and lifelike.
2. They can make your artwork look more professional-grade.
When you learn how to draw realistic lips, you’ll be able to improve the overall quality of your artwork. This is because good lip drawing takes a lot of practice and skill, which can give your work a more polished appearance.
3. They can add dimension and character to your drawings.
Realistic lip drawing can often times create drawings with great dimensionality and character. When done correctly, this technique can add a level of realism that wasn’t possible before.
4. They’re an easy way to improve your skills as an artist overall.
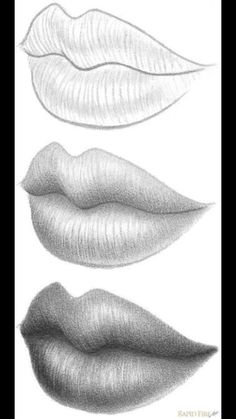
How to draw realistic lips
When it comes to drawing realistic lips, there are a few things that you need to keep in mind. First of all, make sure to pay attention to the contour of the lips – this is where the bulk of the lip will be located. Secondly, be sure to include somedepth and volume in your lips – they shouldn’t look too thin or flat. Finally, use accurate shading and highlights to bring out the details on your lips. Let’s take a look at how to accomplish each of these steps.
1) Start with a basic outline of your lips using a soft brush. Use light strokes to create the outline and avoid going too deep into the contours of your lips.
2) Next, focus on defining the contours of your lips using darker tones. Use hard pressure when drawing these lines so that they are well-defined and consistent. Be sure to also include any bumps or ridges on your lip surface.
3) Once you have finished defining the contours, start adding in some brighter tones around the edges of your mouth. This will help give your lips more life and realism.
4) To finish up, add in some subtle highlights along the top and bottom edge of your lips. These highlights should be very faint – just enough so that you can see them but not so much that they overpower everything else.
The lip shape
Lips are one of the most important features on a face. They can affect your overall appearance and communicate what you’re thinking or feeling. To get realistic lips, follow these tips.
1. Draw a basic shape for your lips using a pencil or HB pen. Start by sketching out a simple curved line, then fill in the edges with light circles.
2. Add detail to the lip using a brush or ballpoint pen. Use short strokes to create small bumps and valleys on the surface of your lips, and use longer strokes to fill in any gaps or shadows between your lip lines.
3. Finally, add color to your lips using a light lemon or orange hue. Use dry brushes to softly add color to the center of your lips only, avoiding darker areas near the edge of your mouth (these will be covered by lipstick later).
The lip line
One of the most challenging aspects of realistic lip drawing is creating the perfect lip line. There are a few key things to keep in mind when drawing this element:
1. Start with the basic shapes. A basic oval shape for the lips is all you need to get started. Don’t worry about making them perfectly round at this stage – that will come later.
2. Add some details. Use small lines to add detail to the outer corners of your lips, and then fill them in with larger strokes. Be sure to vary the thickness and width of your strokes so that they look realistic.
3.Finalize your outline using a light pencil line or brushstroke. This will help give your lip line more depth and definition, and it will also make it easier to erase mistakes later on if needed.
The lip color
Do: Draw a lightly curved line starting at the outer edge of your lips, and continuing inward until it intersects the center of your lip.
Don’t: Try to perfectly capture the natural contours of your lips with a single line. With practice, you’ll be able to create more realistic lips by varying the thickness and curvature of your lines.
Tips for applying lipstick
When it comes to applying lipstick, there are a few cardinal rules that everyone should know. Here are some tips for applying lipstick that will help you achieve the perfect shade every time.
Start with the center of your lips and work your way out. Don’t try to fill in your entire lip with one application. Instead, lighten your lipstick as you go, so it is barely noticeable when applied to the center of your lips.
To apply liner underneath your lipstick, use a small brush and line the inner rim of your lips only. Don’t draw attention to any other lines or creases on your face by filling them in with liner too deeply. Once you have lined your lips, fill them in using a thin layer of black or red lipstick.
Remember to keep things moving! When applying lipstick, always make sure that you are constantly moving the brush around so that the color is evenly distributed across the entire surface of your lips. If you stop making movement and let the color set in one place, it will look cakey and unrealistic.
What are the six steps for drawing realistic lips?
There are six definitive steps for drawing realistic lips:
1. Begin with a basic shape – Start by sketching out a basic outline of the lip, using broad strokes to create the basic form. Don’t be afraid to go back and re-add detail later on.
2. Add highlights and shadows – Use darker tones to add highlights and highlights in lighter colors to create shadows around the outline of the lip. Use varying degrees of pressure when applying these shades, as small inconsistencies will lend life to your drawing.
3. Define lips – Working in light shades around the edges of the mouth, define any sharp angles or edges on the lips. Add subtle details like freckles or whiskers if desired.
4. Paint over background – Once all the defining lines and edges are in place, paint over them with a light layer of color to bring everything together. Be sure not to go too heavy here, as this could cause your drawing to look muddy and unrealistic.
5. Add final details – Finally, add any final details like lashes or lipstick marks if desired. Avoid making these too prominent or they’ll overwhelm your overall work; instead, use subtle touches that will give your lip rendering depth and realism.
Tips for applying lipstick to achieve a natural look
Tips for applying lipstick to achieve a natural look:
1. Start with a light color and build up from there if desired.
2. Apply the lipstick using your fingers to avoid dragging or harsh lines.
3. Smooth out any lumps or bumps with your fingertips before applying the lipstick.
4. Apply lip balm prior to application of lipstick for added moisture and protection.
5. Avoid eating, drinking, or smoking while wearing lipstick as these activities can make the lips look dry and chapped.
How to avoid lipstick lines and other mistakes
There are a few steps you can take to avoid lipstick lines and other mistakes when drawing realistic lips. First, make sure your pencil is sharp. Second, be sure to evenly distribute the color across your lips using light pressure. And lastly, use a lip liner to help create a more defined outline of your lips.
If you still find yourself making errors with your lipstick drawings, don’t worry! There are plenty of tutorials online that will walk you through the process step-by-step. So take some time to practice and you’ll be drawing realistic lips in no time!
Conclusion
If you’re ever feeling unsure about how to draw realistic lips, or just want to get better at the skill, this full guide is for you! In it, we’ll cover everything from the basics of lip anatomy and proportions to tips on adding realism and dimension. Whether you are a beginner artist or have been drawing lips for years, I hope you find this guide helpful in achieving the perfect lip look for your projects.